
Growing up in the Philippines, I’d see international couples and assume their path to a life together was simple: they just had to get married. I never imagined the complex reality behind that dream, especially the labyrinth of the K-1 visa process and requirements.
My fiancé was just as unprepared. An American who never imagined he’d fall for a Filipina. He didn’t know the challenges and sacrifices to bring me there. We started with zero knowledge.
He used to tell me the K-1 process is the “ultimate test of patience and love,” and he was right. It was a tedious, lengthy, and stressful journey, made even more difficult when our case was unexpectedly hit with administrative processing (221G). My fiancé deserves all the credit for the countless hours he spent scouring articles, forums, and blogs to piece together a roadmap. Now, we want to share that hard-won knowledge with you, so your path can be a little clearer than ours.
Table of contents
K-1 Visa Process Explained
Among the various visa options, we filed Form I-129F, the Petition for Alien Fiancé(e), to get what is commonly known as a K-1 Visa. This is a popular choice because it is designed to be the quickest route for a foreign fiancé(e) to enter the U.S. to get married. We are required to marry within 90 days of my arrival in the United States.
Once we were married, the next stage of the immigration process began. This is called Adjustment of Status (AOS), which is the formal application for a green card. Along with the AOS application, we also filed for an Employment Authorization Document (I-765) so I could work, which meant more documents and more waiting.
We are going to do our best to get the K-1 Visa process explained and some tips that might help couples who are in the same situation as us. A friendly reminder that the US government (or the relevant authority) provides the complete step-by-step guide on how to apply for a K-1 visa on the below link:
Here are the steps and tips on how we did ours and we hope you’ll find it helpful to yours.
Step 1: I-129F petition for Alien Fiancé
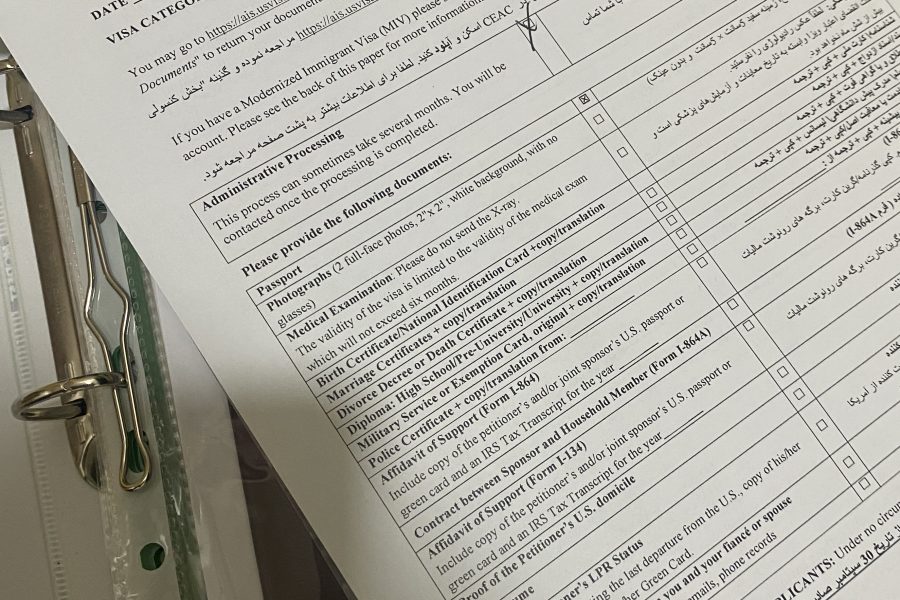
The I-129F petition for Alien Fiancé is a prerequisite to obtaining a K-1 visa. A petition must be submitted and approved by United States Citizenship and Immigration Services (USCIS).
Preparation and Data Gathering
We only have one objective when we started this process – do it right the first time. We need to learn many things about the dos and don’ts to achieve our goal. Check out our recommended resources for an easier process here. My fiancé read directly from the US Bureau of Consular Affairs website, articles, forums, and reviews, and watched vlogs to get information and tips. He told me what documents I needed to obtain, and I made sure that I got them all ready. For this process to go smoothly, there has to be teamwork and open communication.
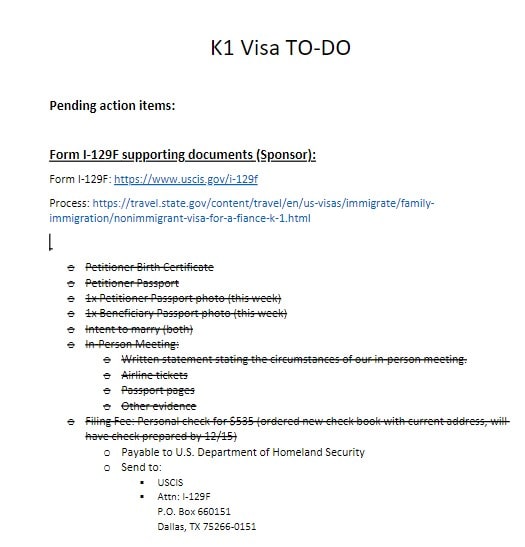
Organizing and having a simple to-do checklist of documents that you will need is very helpful. Here’s our actual list.
Preparing Proof of Relationship
I believe that preparing your proof of relationship is the most critical part of the entire K-1 visa process. Other documents—passports, birth certificates, photos—are just facts. The evidence of your relationship is what tells your story to the officer who will decide your future. It’s how you prove your connection is real and why you deserve to build a life together.
A major factor is providing proof that you have physically been together. One of the non-negotiable requirements for the K-1 visa process is having met in person at least once in the two years prior to filing. A long-distance relationship without at least one in-person meeting will likely face denial.
My fiancé is an incredible planner. When he traveled to visit me in the Philippines, he came prepared with documents for me to sign, ensuring he had everything he needed to file our petition as soon as he returned to the US. We treated every moment together as an opportunity to document our journey. We took hundreds of photos—with my family, my closest friends, and in all the places we visited.
You will hear different opinions on what to include as proof. Some people submit a little, others submit a mountain of evidence. Our philosophy was simple: never take it for granted. This is your life and your petition. Be thorough, be truthful, and build a story so clear and compelling that it cannot be questioned.
Things to include to make your petition stronger:
- A written statement of the circumstances of your in-person meeting. In other words, why/how/when did you meet.
- Create a log of all video calls shared between you both.
- Take screenshot of important conversations that occurred via chat messages. This is very important because it will show the nature of the conversations, and it will give a unique perspective. Be mindful of the content of the chat and don’t provide anything not safe for work and/or very personal.
- Did you send correspondence to your fiancé? Include that.
- Any gifts, purchases, or engagement ring receipts, include that as well.
- Celebrate special occasions via whatever method? Include it too.
Additional tips:
- Take lots of pictures in popular places that are easy to identify, such as country/state landmarks.
- Include your fiancé’s relatives and friends in the set of pictures if possible.
- Your relationship should be genuine; an honest picture will tell a million love stories.
- Use timestamps on your images, it can be helpful to prove you were there at said time.
- Tip: Setup your phone to insert timestamp by default when visiting each other.
- Selfies are needed but also make sure to capture surroundings with it.
- Don’t modify your photos with Photo Editing software’s as it can be seen as “fake” or edited.
How to Tell Your Love Story to USCIS
Beyond the forms and official documents, the K-1 visa process requires something deeply personal: your love story. This narrative is a critical piece of evidence that breathes life into your application. Its official purpose is to help prove your relationship is “bona fide”—genuine and entered into with the sincere intention to marry, not simply to gain an immigration benefit.
While it can feel strange to write about your private life for a government official, this statement is your opportunity to connect the dots for the person reviewing your case. A well-written narrative can be a deciding factor. Although the U.S. citizen petitioner formally writes and signs the primary statement, it should be a collaborative effort, telling a story that reflects both of your experiences.
A strong relationship narrative should be concise yet detailed, painting a clear picture of your past, present, and future.
How Your Story Began (The Past)
This section sets the stage. Don’t just say “we met online.” Provide the specific details that make your story unique.
- The Meeting: When and where did you first connect? Name the specific dating app, website, social media group, or the friend who introduced you. (e.g., “We met on the ‘Interpals’ website on March 15, 2023.”)
- Early Connection: What were your first impressions? Describe how your communication evolved from messages to phone calls and video chats.
- Making it Official: When did you decide you were in an exclusive relationship? Mentioning a specific date adds credibility.
How Your Relationship Grew (The Present)
This is where you demonstrate how you overcame the challenges of long distance and solidified your bond. This section should directly support the other evidence in your petition, like photos and travel records.
- The In-Person Meeting: This is non-negotiable. Detail your mandatory in-person meeting(s) within the last two years. Include dates, locations, and what you did. (e.g., “From June 5-19, 2024, I traveled to the Philippines to meet Maria in person. We spent time in Manila and visited her family in Cebu.”)
- The Proposal: Describe when and how the proposal happened.
- Deepening Your Bond: Mention key events like meeting each other’s family and friends (name them!), celebrating holidays together over video chat, or supporting each other through significant life events.
Your Plans for a Future Together
This section affirms your intentions and concludes your story with a look forward.
- Statement of Intent: You must explicitly state your intention to marry within 90 days of your fiancé(e)’s arrival in the United States on the K-1 visa process. This is a legal requirement.
- Important: This should be its own letter often called “letter of intent (LOI)” on the web.
- Life in the U.S.: Briefly describe your plans. Where do you intend to live? What are you looking forward to doing together once you’re married and the immigration process is complete?
- Closing Affirmation: End with a sincere sentence reaffirming your love and commitment to building a life together in the United States.
By thoughtfully detailing your journey, you provide the USCIS officer with a clear and compelling reason to approve your petition and unite you as a couple.
A Guide to Filling Out Form I-129F
Once you have gathered all your supporting evidence—your proof of relationship, photos, letters of intent, and other vital documents—it’s time to face the centerpiece of your petition: Form I-129F, Petition for Alien Fiancé(e).
This is the official form that the U.S. citizen partner (the “petitioner”) files with U.S. Citizenship and Immigration Services (USCIS) to formally request permission for their foreign partner (the “beneficiary”) to enter the country for marriage.
What the Form Asks For
The form itself is essentially a detailed questionnaire about both of you. While the U.S. citizen petitioner fills it out, they will need specific personal details from the foreign beneficiary. Be prepared to provide a complete history for the last five years, including:
- Residential History: A full list of all physical addresses.
- Employment History: A record of all employers, including their addresses and your dates of employment.
- Personal and Marital History: Details about any previous marriages, how they ended, and information about your parents and children.
- Declarations and Statements: You will need to attest to the legitimacy of your relationship and your intent to marry.
Navigating the Form’s Quirks: Our Experience
While filling out the form is mostly straightforward, you might run into confusing questions that don’t seem to fit your situation perfectly. We certainly did.
My fiancé was born in Puerto Rico, a U.S. territory. When we got to the “Country of Birth” section on the form, we were stumped. The dropdown menu listed countries and U.S. states, but there was no option for U.S. territories. This small detail caused us a bit of confusion and anxiety—the last thing you want is to make a mistake on such an important document.
After some research, we found the correct answer: for individuals born in a U.S. territory like Puerto Rico, you should select the “United States” and then list the specific territory (e.g., “San Juan, Puerto Rico”) in the “City/Town/Village of Birth” field.
This is a perfect example of how the K-1 process can throw you a curveball. The key is to be patient, research any points of confusion thoroughly, and always double-check your answers. The official USCIS instructions for Form I-129F are your best friend—read them carefully before and after you fill out the form to ensure every detail is accurate.
Final Checklist: Critical Tips for a Perfect I-129F Submission
Before you seal that envelope and send your petition to USCIS, it’s essential to perform a final review. Small mistakes on the form can lead to rejection or significant delays. Based on our own experience, here are the most critical points to double-check.
1. Use the Correct and Current Form Version
USCIS regularly updates its forms. Submitting an outdated version of Form I-129F will result in an automatic rejection.
- Action: Go directly to the official USCIS I-129F page and download the latest version. Check the “Edition Date” at the very bottom of the PDF and make sure it matches the current version listed on the website.
2. Complete Every Single Field
An empty field can cause confusion or get your form flagged for being incomplete.
- Action: Do not leave any fields blank. If a question does not apply to you, write “N/A” (Not Applicable). If the answer is zero, write “None”. For example, in the “Middle Name” field, if you don’t have one, write “N/A”.
3. Pay Close Attention to Printing Details (The Footer is Crucial!)
This is a technical but critical step where many people have problems. The footer on each page of the I-129F contains a unique 2D barcode and page numbers that are essential for USCIS processing.
- The Problem: Some web browsers or PDF viewers may automatically “shrink to fit” when printing, which can cut off this vital footer. A form submitted without these barcodes will be rejected.
- Action: When printing your completed PDF, go into your printer settings. Ensure that “Page Sizing” is set to “Actual Size” or “100%,” not “Fit” or “Shrink oversized pages.” After printing, manually check every single page to confirm the barcode and edition date at the bottom are fully visible. This issue caused us a lot of trouble, so we can’t stress this enough.
4. Include Additional Information Correctly
The space provided on the form is often insufficient for things like your 5-year address or employment history.
- Action: Form I-129F has a dedicated section at the end (Part 8) titled “Additional Information.” Follow the form’s instructions to add any overflow details here. Clearly label each entry by referencing the page number, part number, and item number it corresponds to.
5. The Petitioner MUST Sign the Form
An unsigned form is like an unsigned check—it’s invalid.
- Action: After printing the final, perfect copy, the U.S. citizen petitioner must sign the designated field in Part 7 with an original, handwritten signature. Make sure the signature is in black ink and stays within the box. A photocopied or digital signature is not acceptable.
Paying the Filing Fee: The First Step to Acceptance
Submitting the correct filing fee is a critical, non-negotiable step. If the fee is missing, incorrect, or cannot be processed, USCIS will reject your entire petition package. Here is what you need to know to get it right.
Current Filing Fee (as of June 2025)
As of June 2025, the filing fee for Form I-129F is $675. The fee was $535 in 2024.
Pro Tip: USCIS fees can change. Before you send your petition, always visit the official USCIS I-129F page to confirm the most current fee amount. Submitting the wrong amount is one of the most common reasons for rejection.
Accepted Payment Methods
You have a couple of options for payment. The check must be included with your application package when you mail it.
Option 1: Check or Money Order
This is the traditional method.
- Make the check or money order payable to: U.S. Department of Homeland Security.
- Do not use any abbreviations like “DHS” or “USDHS.” Write out the full name exactly as shown.
- Ensure the check is properly dated and signed.
Option 2: Credit Card
For many, this is a more convenient option that provides clear tracking.
- To pay by credit card, you must complete and sign Form G-1450, Authorization for Credit Card Transactions.
- Place the completed G-1450 form on top of your entire application packet. USCIS will see this first, process the payment, and then continue with your petition.
What Happens Next: The First Sign of Progress
Once USCIS receives your package, the very first action they take is processing your payment.
Shortly after your payment is successfully processed (typically within 2-4 weeks), you will receive Form I-797C, Notice of Action in the mail. This official receipt is incredibly important—it will contain your unique Receipt Number, which you will use to track your case status online.
You will see the check being cashed or the charge appearing on your credit card statement. This is your first confirmation that your petition has been accepted for processing.
Assembling and Mailing Your Petition Package
Once you’ve gathered, signed, and triple-checked every document, you’ve reached the final milestone of the initial filing process: compiling and submitting your petition. A neat and logically organized package can make a positive impression and ensure the USCIS officer can easily review your case. This is how we recommend you assemble it.
Organize Your Documents in a Logical Order
Think of your package as a book, with the most important information at the front. While there is no single “required” order, the following structure is logical and widely used for its clarity. Use heavy-duty paper clips or binder clips for each section—do not use staples, as they must be removed for scanning.
Find the Correct Mailing Address
Do not guess where to send your package. The correct mailing address depends on where the U.S. petitioner lives and which delivery service you use (USPS has a different address than courier services like FedEx or UPS).
- Action: You must go to the official USCIS website to find the correct mailing address. Visit the Direct Filing Addresses for Form I-129F page. Select the correct address based on your state and chosen delivery service.
Final Tips Before You Mail
- Make a Complete Copy: Before sealing the envelope, make a full, exact copy of the entire petition package for your own records. You will refer to this later.
- Use a Trackable Mail Service: Send your package using a method that provides tracking and delivery confirmation, such as USPS Certified Mail, FedEx, or UPS. This provides proof that USCIS received your package and gives you peace of mind.
Once the package is sent, take a deep breath and celebrate. You have successfully navigated a complex K-1 visa process and completed a major step toward closing the distance for good.
Here is our list of documents in order:
- Cover Letter
- The check and our passport sized photos signed on the back.
- Note: Make sure to inform the photo center to have it in US passport size. Every country has different photo passport sizes, so it is better to have the correct one to save time.
- Filled up Form G-1145 – e-Notification of Application/Petition Acceptance – USCIS.
- Filled up Form I-129F.
- Supplement to Form I-129F – Explanation of Meeting written by petitioner.
- Letter of Intent to Marry by Petitioner & Beneficiary in original copies.
- Disclaimer from the app where we met stating that they are not a marriage broker.
- Petitioner’s passport copy with stamps when he traveled to the Philippines.
- Petitioner’s birth certificate copy.
- Beneficiary’s passport copy.
- Beneficiary’s birth certificate.
- Beneficiary’s certificate of no marriage.
- Beneficiary’s NBI (National Bureau of Investigation) clearance.
- Proof of Meeting in Person (Photos such as our engagement, meeting my family, friends, and places we visited together.
- Ours eTravel confirmation (Philippines).
- Hotel booking confirmations.
- Flight tickets/boarding passes.
- Proof of Ongoing Relationship (Photos, gifts, flight tickets to Dubai (planned travel).
- WhatsApp’s call logs and messages.
- Divorce Decree/s (to be included whenever applicable).
The documents were sent via USPS. We received an email that our case had been accepted. Make sure to check your email’s spam folder at this point in your K-1 visa process as not to miss the notification. My fiancé received ours in the spam folder. Every email provider will behave differently with this type of emails.

Step 2: The Waiting Game & Petition Approval
You’ve sent your package, the fee has been cashed, and you have your receipt number. Now, the longest and most difficult part of the K-1 visa process often begins: the waiting.
The Reality of “The Wait”
We thought we would feel relieved after submitting our petition and getting to this stage in the K-1 visa process, but it was the opposite. The anxiety and impatience grew with each passing day. My fiancé and I discussed it constantly, our excitement mixed with a persistent worry about how long the approval would take. This feeling is completely normal. You’ve poured your heart and hopes into that package, and now it’s out of your hands.
You will likely spend a lot of time checking online forums and comparing your timeline with others. You’ll read about some USCIS service centers processing petitions faster than others and may worry if your case is at a “slow” one. Our petition was sent to a center known for longer processing times, yet we received a relatively quick approval.
The truth is, every case is unique. While it’s helpful to see others’ timelines, the approval time for your specific petition can range significantly.
Tracking Your Case Status
You can monitor the status of your petition on the official USCIS Case Status Online page using the receipt number from your I-797C Notice of Action.
It’s important to understand what you’ll see. While you won’t get detailed progress reports, your status will change over time. You will likely see statuses such as:
Case Was ReceivedActively Being ReviewedCase Was Approved
Seeing your status change to “Actively Being Reviewed” is the first sign that an officer is looking at your file.
Petition Approved: What It Means
Receiving the approval notice is a massive cause for celebration! This means USCIS has determined that you have a bona fide relationship and have met the initial requirements.
Once your I-129F petition is approved, USCIS’s job is done for now. They will forward your approved petition to the U.S. Department of State’s National Visa Center (NVC). This handover marks the official start of the second major phase of your K-1 visa journey, where the focus shifts from the U.S. petitioner to the foreign fiancé(e) in their home country.
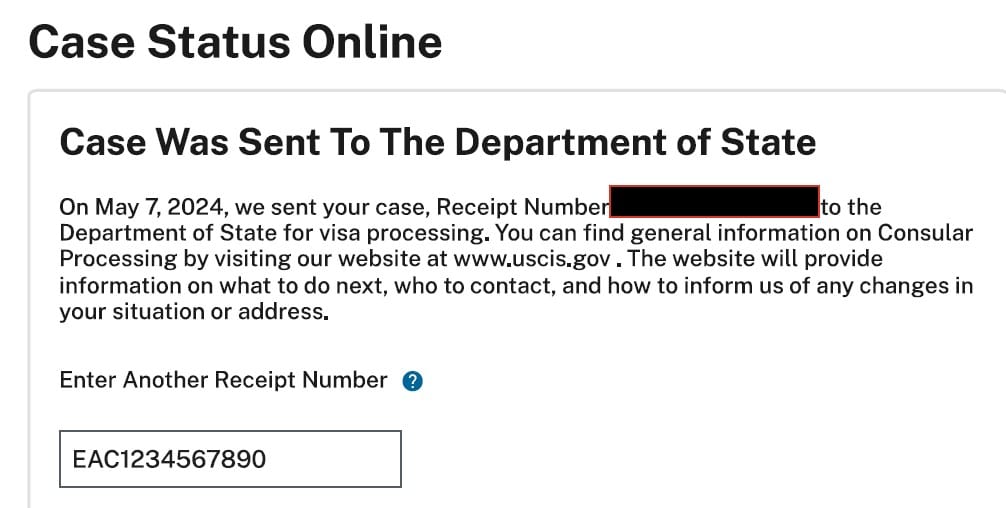
USCIS received our petition on January 19, 2024. We received our I-797C Notice of Action, commonly known as NOA1. Then, we received approval on May 3, 2024, at which time we received our I-797 Notice of Action, commonly known as NOA2. The National Visa Center will receive our paper for further processing. While we wait, we’ve started drafting our DS-160 nonimmigrant application so that we will know ahead of its actual filing what else we are missing or need.
I-129F Petition Processing Timeline
| January 15, 2024 | Day 0 | I-129F Petition filed. |
| January 19, 2024 | Day 4 | Petition received by USCIS California Service Center. |
| January 24, 2024 | Day 9 | 1-797C, Notice of Action (NOA1) received via mail. |
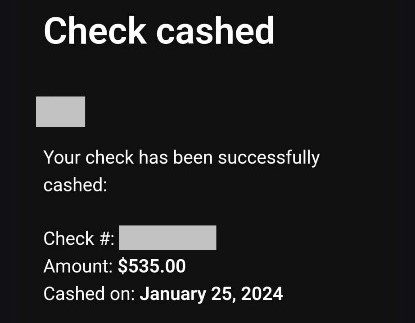
| January 25, 2024 | Day 10 | Check payment cashed. |
| May 3, 2024 | Day 99 | Case approved. |
| May 7, 2024 | Day 103 | USCIS sent petition to NVC. |
| May 9, 2024 | Day 105 | I-797, Notice of Action (NOA2) Approval received via mail. |
| May 24, 2024 | Day 120 | NVC case created, and petition sent to US Embassy Abu Dhabi. |
| May 24, 2024 | Day 120 | Received K1-FTP Letter. |
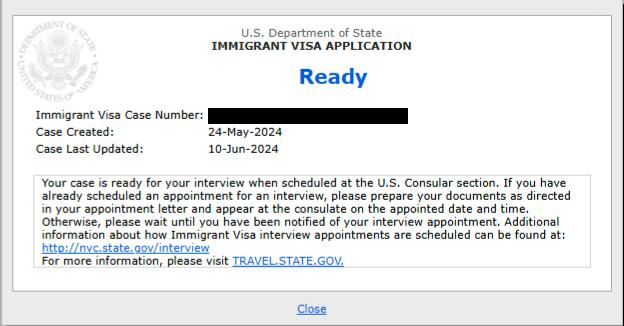
| June 10, 2024 | Day 137 | Case updated to “Ready” |
| June 26, 2024 | Day 153 | Received “Packet 3” or instructions to schedule interview and next steps via email. |
| July 18, 2024 | Day 175 | Interview. |
Step 3: NVC Processing
When the NVC completes further processing on your petition, it will forward your approved petition to the U.S. Embassy or consulate where your fiancé will be interviewed.
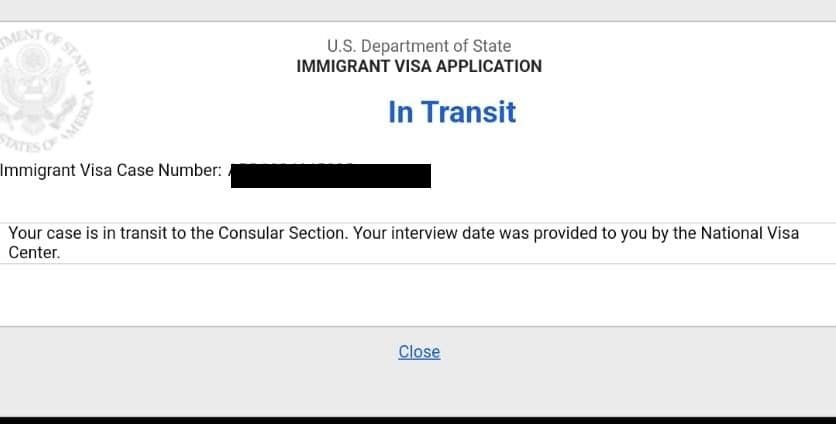
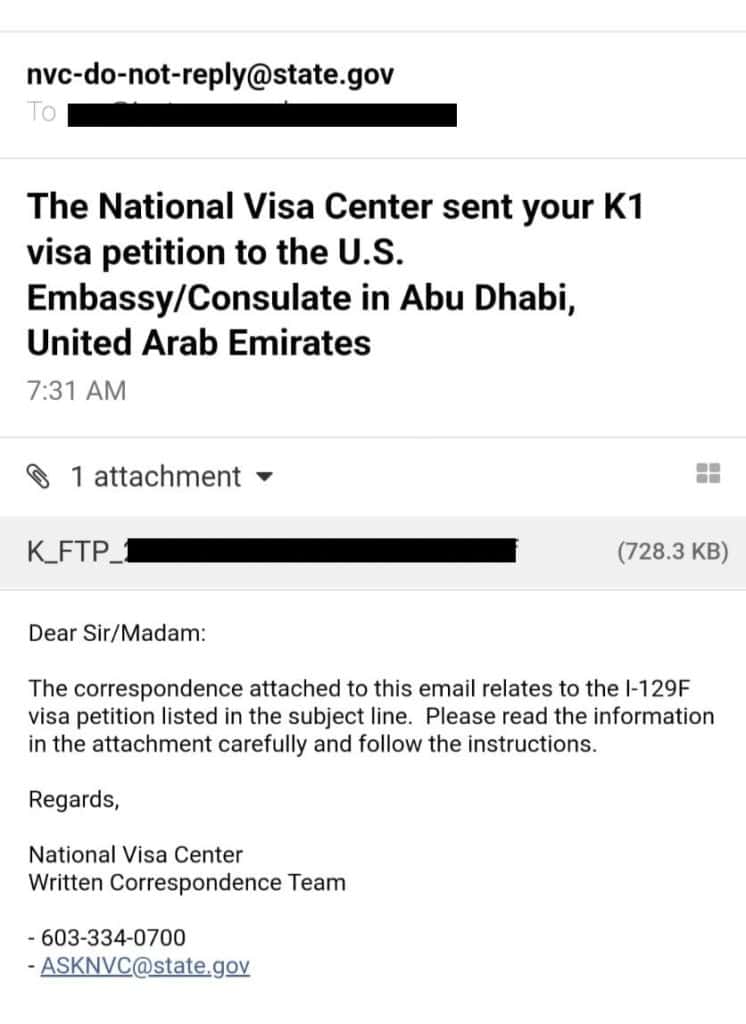
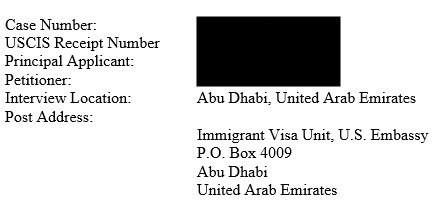
The National Visa Center notified us via email that they sent our documents to the U.S. Embassy in Abu Dhabi, where I will do my interview. The email contains the K1-FTP letter, which includes all the details about the petition. If you are wondering, what exactly is the K1-FTP letter. We created an informational post explaining what is the K1-FTP letter.
K1-FTP
Step 4: DS-160
The embassy will notify you when you are ready to complete and submit a DS-160 K-1 nonimmigrant visa application. This is the actual Visa application. It is best practice to start your DS-160 application as soon as possible. Think about it as having it pre-filled or in draft before its actually needed. We started our draft as soon as NVC transferred our case to the US Embassy in Abu Dhabi. You can save the application and reuse it at a later time by following the steps on the website. You can access the Consular Electronic Application Center website to find instructions on how to complete your application.
The DS-160 application contains multiple parts to complete. For a detailed explanation of these parts, check how we completed our DS-160 application for K1 Fiancé Visa.
Parts to complete:
- Location Information
- Personal Information
- Travel Information
- Family Information
- Security and Background Information
- Work, Education, Training Information
- Confirmation page
After the application is submitted, and the fees paid. It is very important to take note of the Application ID as this will be needed to retrieve the application information in the future.
Step 5: Medical Exam
The medical exam is a requirement for the interview. In the instructions the embassy provided, there is a list of accredited clinics where you can take the exam. For my US medical exam, I decided to go to NMC Medical Centre located in Deira Dubai, United Arab Emirates. The clinic is located in the opposite side of Abu Hail Metro Station. For medical exams you do not need an appointment, and they are available even on holidays.
Here are the requirements during the medical exam:
- DS160 confirmation page with bar code
- Embassy appointment letter
- 4x passport US size photos – white background
- 4x copies of passport
- Passport (original)
- Vaccination records
- Appointment day form:
- Name
- Birthday
- US Address (where you moving to)
- US Contact Information
Step 6: Interview
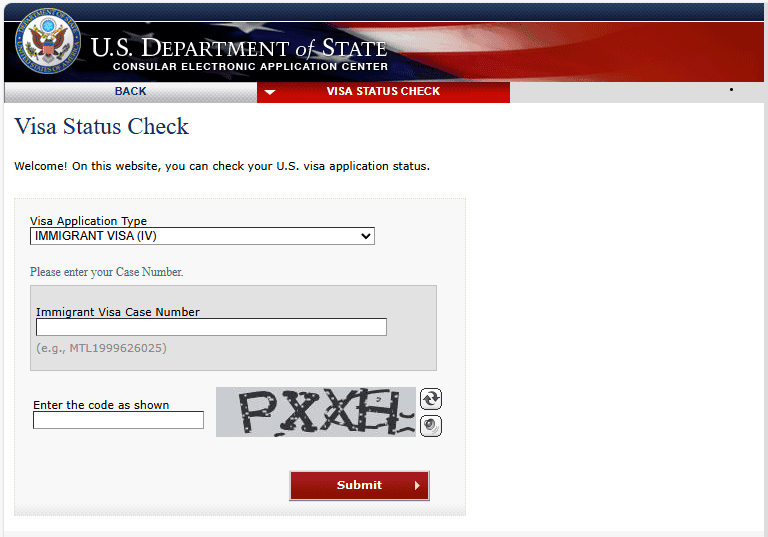
Completing half of the K-1 visa process occurs when USCIS approves the petition. The applicant’s actual personal interview result at the embassy will conclude the rest of the process. The interview can only result in instant approval, refusal (221g status) administrative processing, or denial. Throughout this process, you can check your visa status using the case number provided in the K-1-FTP, on the Consular Electronic Application Center (CEAC) website.
For applicants processing through the U.S. Embassy in Abu Dhabi, your case status may update to “Ready” online, creating a moment of excitement. However, you cannot book your interview appointment just yet. You must first receive a specific “welcome packet” email directly from the Embassy.
What Not to Do While Waiting
It is crucial to be patient during this stage of the K-1 visa process. For example, our own case status updated to “Ready” on June 10, 2024, but we did not receive the official instruction email from the embassy until June 26, 2024—a wait of over two weeks.
Specifically, the embassy’s email will provide you with the unique instructions and permissions needed to access the scheduling system. Attempting to schedule your interview before receiving these explicit directions, the embassy will likely cancel your appointment on the day you are scheduled to appear.
Therefore, to avoid this frustrating mistake, carefully follow the directions provided by your assigned embassy. Each one has its own specific procedures and overlooking them can cause unnecessary delays in your K-1 visa process.
I completed the interview on July 18, 2024. Unfortunately, I received a white slip with a refusal under the 221G or Administrative Processing.
Our 221(g) Nightmare: How a Single Stamp Derailed Our Visa
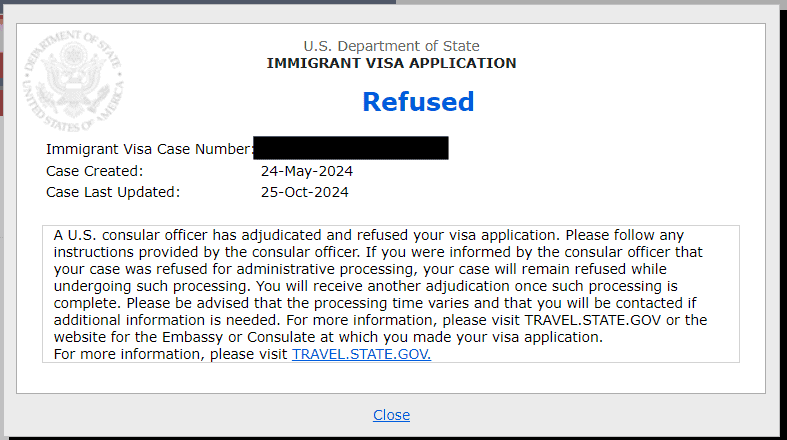
the interview.
The moment the consular officer slid the white 221(g) slip across the counter, our hearts sank. We had entered what many call the “black hole” of visa processing—a state of administrative limbo with no clear end in sight. The reason was as frustrating as it was unexpected.
The issue was my fiancé’s certified divorce decree. In an effort to be perfectly prepared, he had ordered a brand-new certified copy shortly before my interview. He wanted the most current document possible. But this proactive step backfired spectacularly.
The consular officer glanced at the decree, and their eyes fixed on the “Certified Stamp Date.” They saw a very recent date and immediately concluded that the divorce itself was recent—finalized long after we had started our K-1 visa process. This, in their view, made me ineligible. The confusion between the date the copy was certified and the date the divorce was legally final was enough to stop everything.
We were left trying to explain a bureaucratic detail to an officer who had already made up their mind, all because different states use different methods for stamping their legal documents. It was a moment of pure, stressful helplessness.
Tips to Prevent a 221G
My tip from this painful experience is this: If you have a divorce decree in your file, study it like you’re preparing for a final exam. If an officer points to any date, you must be ready to explain precisely what it means, even if it seems obvious. Your ability to calmly clarify a small detail could be what saves you from the anxiety and uncertainty of a 221(g) refusal.
221G Administrative Processing Timeline
| July 18, 2024 | Day 0 | Interview and 221G administrative processing |
| September 17, 2024 | Day 61 | Email inquiring about status (no reply). |
| October 4, 2024 | Day 78 | Email inquiring about status (no reply). |
| October 7, 2024 | Day 81 | Case updated. |
| October 15, 2024 | Day 89 | Reached out to Florida Congressman. |
| October 17, 2024 | Day 91 | Florida Congressman reached out to the US Embassy in Abu Dhabi. |
| October 21, 2024 | Day 95 | Case updated. |
| October 23, 2024 | Day 97 | Administrative processing completed. Passport requested. |
| October 24, 2024 | Day 98 | Passport submitted. |
| October 25, 2024 | Day 99 | Case updated. |
| October 28, 2024 | Day 102 | Case updated. |
| October 29, 2024 | Day 103 | Case status updated to “Application Received”. |
| October 31, 2024 | Day 105 | Case status updated to “Approved”. |
| October 31, 2024 | Day 105 | Case status updated to “Issued”. |
| November 1, 2024 | Day 104 | Visa ready for pickup. |
Case Status Tips
The embassy updates the “case last updated” field whenever they work on your case or whenever you send an email to the embassy requesting a status update. Don’t create false hope by spamming as this will probably irritate the consular officers and the “case last updated” field will be updated by your inquiries instead of an officer action. Every embassy has their own rules and timeframes you have to wait before you can reach out for more information. On the K-1 visa process, the timeframe is usually more than 60 – 90 days after the interview date if your case was put in administrative processing via 221G. This is a good sign that the application is moving forward. However, the status will remain the same until they provide an update. Check this post if you want to know how to follow up and reach out to the Abu Dhabi embassy.
Case Status Updates
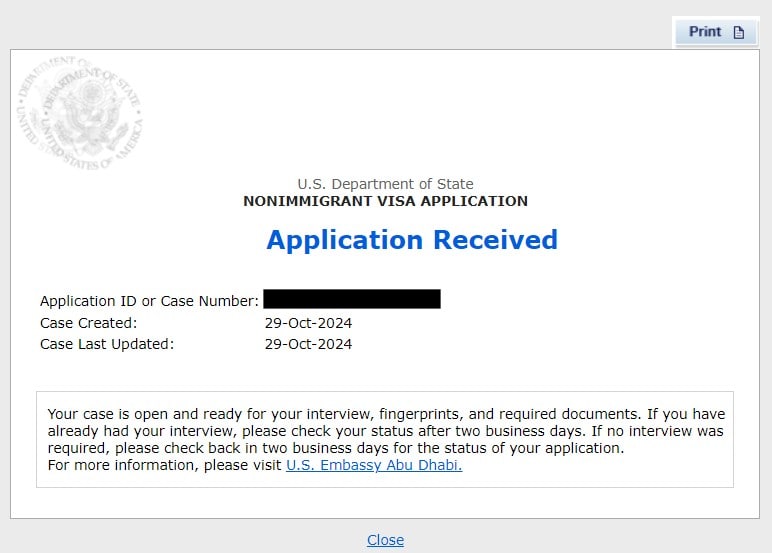
When the status changed from “Refused” to “Application Received“, the embassy will send an email with instructions to send the original passport of the applicant for visa stamping.
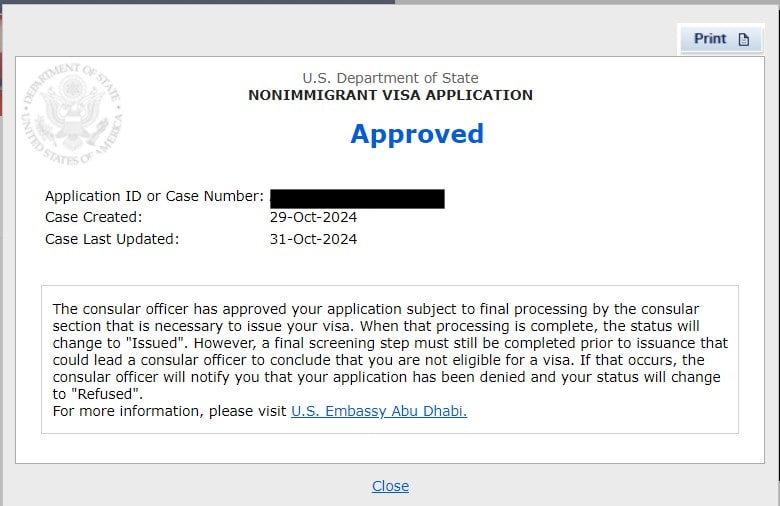
If it shows as “Approved” it means the visa has been approved but it doesn’t mean the visa has been issued until the status changed to the last update “Issued“.
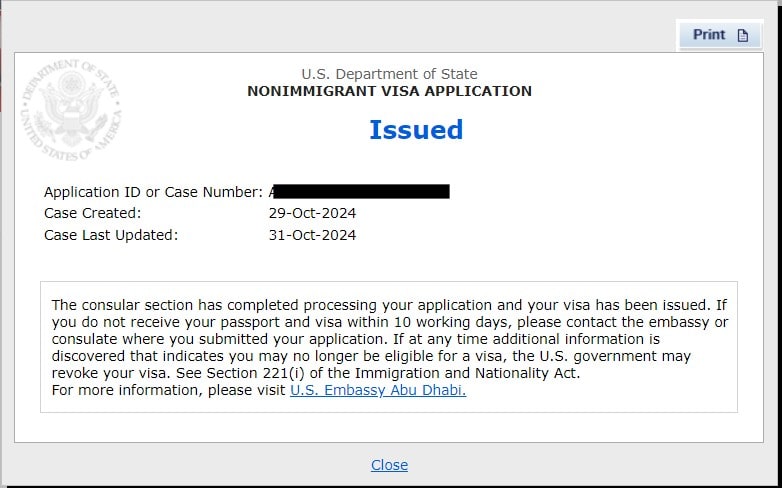
Once the embassy issues the visa, they will send another email notifying you that they have sent the passport back to the post office for you to pick up, or that they have sent it to your chosen accredited courier, which you selected when scheduling the interview.
Now, feel free to celebrate your accomplishments up to this point.
Get more information about tracking your documents.
Step 7: Arrival at the U.S. Port of Entry
This is the moment you’ve been waiting for: landing on U.S. soil. The final step is to be formally admitted into the country by a U.S. Customs and Border Protection (CBP) officer at your Port of Entry (e.g., the airport). While it can be an intimidating experience after a long flight, knowing what to expect can make the process smooth and straightforward.
Here’s a breakdown of the process, using my own arrival at Miami International Airport as an example.
Primary Inspection
When you deplane, you will first go to the immigration hall and wait in line for an initial check with a CBP officer.
- The officer will ask for your passport.
- They will likely ask a simple question, such as, “What is the purpose of your visit to the United States?”
When the officer sees the K-1 visa stamp in your passport, it is standard procedure for them to refer you for a more detailed review. Do not be alarmed by this. This is a normal and required step for K-1 visa holders. The officer will likely retain your passport and escort you or direct you to a separate waiting area for “secondary inspection.”
Secondary Inspection
This is where your entry is officially processed. In my case, I was taken to a Bureau of Customs and Ports office. Here’s what happened:
- Document Request: The CBP officer asked for the large, sealed visa packet given to me by the U.S. Embassy. It is absolutely critical that you do not open this packet yourself. They will also ask for your medical examination report. Have these documents easily accessible in your carry-on luggage, not in your checked bags.
- Verification: The officer opened the packet and reviewed all the documents to verify my identity and the legitimacy of my visa.
- Questioning: They asked a few simple questions to confirm my details, including the address where I would be staying with my fiancé in the U.S.
- Final Processing: Once satisfied, the officer stamped my passport, officially admitting me into the country as a K-1 nonimmigrant. This stamp serves as my I-94 Arrival/Departure Record and shows the date I entered and the date by which I must marry—90 days from entry.
They handed my passport back to me along with a small information sheet summarizing the next steps and legal requirements of my status. From there, I was free to collect my luggage and finally meet my fiancé.
Key Tips for a Smooth Entry:
- Keep Documents Handy: Your passport, the sealed visa packet, and your medical exam results should be in your carry-on bag at all times.
- Know Your Fiancé’s Details: Have your fiancé’s full name, address, and phone number memorized or written down.
- Be Patient and Polite: The officers are doing their job. Answer all questions truthfully and respectfully.
- Don’t Book Tight Connections: If you have a connecting flight, allow several extra hours (at least 3-4) to get through the immigration and customs process.
Congratulations! After passing through the Port of Entry, you have successfully completed your K-1 visa journey and can now begin your life together in the United States.
Step 8: Getting Married Within 90 Days
You made it! After a long journey through paperwork, interviews, and international travel, you are finally together in the United States. Take some time to settle in, relax, and celebrate this incredible milestone. You’ve earned it.
However, amidst the joy, you must focus on the single most important deadline of your entire K-1 journey.
A CRITICAL REMINDER: YOU MUST GET MARRIED WITHIN 90 DAYS OF ARRIVAL.
This is not a guideline; it is a strict, legally binding requirement of the K-1 visa process. The date of entry stamped in your passport at the Port of Entry starts the 90-day clock. Failing to marry within this window automatically expires your K-1 status, requiring you to leave the United States immediately. It invalidates the entire process and can severely complicate any future immigration attempts.
The Marriage Process in the U.S.
The good news is that the legal process of getting married in the United States is typically very straightforward. The process is governed by state law, so the exact steps and fees will vary depending on where your U.S. citizen partner resides.
The universal first step is to obtain a Marriage License from a local government office, usually called the County Clerk of Court or a similar name. This license is the official document that grants you permission to be legally married.
Our Experience in Florida (as of June 2025)
To give you a concrete example, here is how we handled the process in Florida. Keep in mind that these details are specific to our state and county.
- Visit the Clerk of Court: We went to our local Clerk of Court office to apply for our marriage license.
- Obtain the License: The fee for the marriage license was $86.00.
- On-the-Spot Ceremony: Many Clerks of Court offices, including ours, offer the option to perform the marriage ceremony right then and there. We chose this option for its simplicity. The ceremony fee was $30.00.
- Marriage Certificate: The ceremony fee included one certified copy of our marriage certificate, which is the crucial document you will need for the next phase: Adjustment of Status. We requested additional certified copies for our records at a small extra cost.
A unique aspect of Florida law is that no witnesses are required for the marriage ceremony, which streamlined the process for us.
Key Steps for Your Marriage:
- Research Local Requirements: As soon as you are settled, visit the website for the County Clerk of Court in the town where you plan to marry. Look for information on marriage licenses to find their specific requirements regarding fees, necessary documents (like photo IDs), and whether witnesses are needed.
- Get Your License: Go together to the Clerk’s office to apply for and receive your marriage license.
- Have the Ceremony: Whether you have a large wedding or a simple civil ceremony at the courthouse, make sure it happens before the 90-day deadline.
- Obtain Your Certified Marriage Certificate: This is the legal proof of your marriage and the cornerstone of your application to adjust status to a permanent resident.
Once you have that marriage certificate in hand, you have officially completed the K-1 visa process. Congratulations! Your next journey together—applying for a Green Card—is about to begin.
Step 9: Adjustment of Status (AOS) – The Path to a Green Card
With your marriage certificate in hand, you have successfully completed the K-1 visa requirements. The next and final major chapter in your immigration journey is to apply for a Green Card. This process is officially known as Adjustment of Status (AOS), and it begins with filing Form I-485, Application to Register Permanent Residence or Adjust Status.
This application formally asks USCIS to change your status from a K-1 nonimmigrant to a Lawful Permanent Resident. As always, you must download the latest version of the form directly from the official USCIS I-485 page to avoid an automatic rejection.
The Concurrent Filing Package: More Than Just a Green Card
When you submit your I-485 application, you have the option to simultaneously file for two other crucial benefits. This is often called “concurrent filing.”
- Form I-765: Application for Employment Authorization (Work Permit) This form is for an Employment Authorization Document (EAD), commonly known as a work permit. While technically optional, we consider this absolutely essential. The EAD card is your key to legally working in the U.S. and is often required for:
- Obtaining a Social Security Number (SSN).
- Applying for a state driver’s license.
- Passing employment verification with a new job.
- Signing apartment leases or opening certain bank accounts.
- Form I-131: Application for Travel Document (Advance Parole) This application is for Advance Parole, which allows you to travel internationally while your Adjustment of Status application is pending and re-enter the U.S. without abandoning your Green Card application.
Important Changes to Fees and Processing Times
- Separate Filing Fees: Under the old rules, the fees for the I-765 and I-131 were included with the I-485 fee. This is no longer the case. As of June 2025, you must pay separate filing fees for each application. Be sure to check the USCIS website for the most current fee amounts for all three forms.
- Processing Times: While you may hear stories of very fast approvals, it’s best to refer to the official USCIS processing times tool. The approval for an EAD (Form I-765) is now prioritized and is generally much faster than the Green Card itself, often taking a few months. This allows you to start working and integrating into U.S. life long before your final Green Card interview.
Filing this complete package—I-485, I-765, and I-131—at the same time is the most efficient way to secure your ability to work, travel, and ultimately, become a permanent resident of the United States.
The Biometrics Appointment: Verifying Your Identity
A few weeks after you file your Adjustment of Status (AOS) package, you will receive a notice in the mail for a mandatory biometrics appointment. This is a standard and crucial part of the process for every applicant.
The purpose of this appointment is for U.S. Citizenship and Immigration Services (USCIS) to collect your unique biological identifiers to conduct thorough security and criminal background checks with the FBI. This is not an interview, and the U.S. citizen partner is not required to attend.
What Happens at the Appointment?
The appointment itself is quick and straightforward, usually taking less than 20 minutes. You will be directed to a local Application Support Center (ASC), where a technician will:
- Take your digital fingerprints.
- Take your photograph.
- Capture your electronic signature.
You will be asked to confirm that the information on your application is true and correct. Afterwards, the technician will stamp your appointment notice to confirm you attended. Keep this stamped notice in a safe place with your other immigration documents.
How to Prepare for Your Appointment
Biometrics Fee: As of the USCIS fee changes in April 2024, the biometrics service fee is now included in the total filing fee for Form I-485. You do not need to pay a separate biometrics fee for this application.
What to Bring: You must bring two things:
Your official appointment notice (Form I-797C, Notice of Action).
A valid, unexpired form of photo identification. Your passport is the best option. A U.S. driver’s license or other government-issued photo ID is also acceptable.
What NOT to Bring: To ensure a quick entry through security, do not bring food, drinks, or any weapons. You will likely be asked to turn off your cell phone.
AOS and EAD Timeline
| November 27, 2024 | Day 0 | I-485 and I-765 filed on November 27, 2024. |
| December 4, 2024 | Day 7 | Case received notification on December 4, 2024. |
| December 9, 2024 | Day 12 | Noticed of Action 1 (NOA1) by mail. USCIS provides information to access your account. |
| December 21, 2024 | Day 24 | Biometrics appointment scheduled. Email received with information. |
| January 6, 2025 | Day 40 | Biometrics appointment day. |
| January 8, 2025 | Day 42 | I-765 Work Authorization approved. |
| January 16, 2025 | Day 50 | I-765 EAD card produced. |
| January 18, 2025 | Day 56 | I-765 EAD card received by mail. |
| Present as of June 11, 2025 | Day 156 | Still waiting for the Adjustment of Status / Green Card. |
Conclusion
Navigating the K-1 visa process is a true marathon—a journey of meticulous paperwork, patient waiting, and unwavering commitment. While the path is long and the steps are precise, it is not a game of chance. Your success isn’t determined by luck, but by the diligence, honesty, and thoroughness you pour into your petition.
From assembling your proof of relationship to facing the final interview, every step is an opportunity to present a clear, compelling, and undeniable story of your love. The consular officer’s decision is indeed the final hurdle, but they are not looking for reasons to deny you; they are looking for convincing reasons to approve you. By following the steps, providing robust evidence, and being truthful, you provide them with every reason to say “yes.”
You have the tools and the knowledge to build a strong case. Trust in your preparation, trust in your story, and look forward to the incredible moment when you can finally close the distance and begin your new life together. You can do this.


Leave a Comment